Fury on GKE
This step-by-step tutorial helps you deploy a subset of the Kubernetes Fury Distribution on a GKE cluster on GCP.
This tutorial covers the following steps:
- Deploy a GKE Kubernetes cluster on GCP with
furyctl. - Download the latest version of Fury with
furyctl. - Install Fury distribution.
- Explore some features of the distribution.
- Teardown the environment.
⚠️ GCP will charge you to provision the resources used in this tutorial. You should be charged only a few dollars, but we are not responsible for any charges that may incur.
❗️ Remember to stop all the instances by following all the steps listed in the teardown phase.
💻 If you prefer trying Fury in a local environment, check out the Fury on Minikube tutorial.
The goal of this tutorial is to introduce you to the main concepts of KFD and how to work with its tooling.
Prerequisites
This tutorial assumes some basic familiarity with Kubernetes and GCP. Some experience with Terraform is helpful but not strictly required.
To follow this tutorial, you need:
- GCP Access Credentials of a GCP Account with
Project Ownerrole with the following APIs enabled:- Identity and Access Management (IAM) API
- Compute Engine API
- Cloud Resource Manager API
- Kubernetes Engine API
- Docker - a Docker image containing
furyctland all the necessary tools is provided. - OpenVPN Client - Tunnelblick (on macOS) or OpenVPN Connect (for other OS) are recommended.
- Google Cloud Storage (optional) to hold the Terraform state.
Setup and initialize the environment
Open a terminal
Run the
fury-getting-starteddocker image:
docker run -ti --rm \
  -v $PWD:/demo \
  registry.sighup.io/delivery/fury-getting-started
- Clone the fury getting started repository containing all the example code used in this tutorial:
git clone https://github.com/sighupio/fury-getting-started
cd fury-getting-started/fury-on-gke
- Setup your GCP credentials by exporting the following environment variables:
export GOOGLE_CREDENTIALS=<PATH_TO_YOUR_CREDENTIALS_JSON>
export GOOGLE_APPLICATION_CREDENTIALS=$GOOGLE_CREDENTIALS
export GOOGLE_PROJECT=<YOUR_PROJECT_NAME>
export GOOGLE_REGION=<YOUR_REGION>
💡 by default this guide uses n1-standard-* instances. Check that this type is available in the chosen region, for example, europe-west6 (otherwise you'll have to adjust the various configuration files with a supported instance type).
You are all set ✌️.
Step 1 - Automatic provisioning of a GKE Cluster
You will use furyctl to automatically provision a GKE cluster. furyctl is a command-line tool developed by SIGHUP to support:
- the automatic provisioning of Kubernetes clusters in various environments.
- the installation of the Fury distribution.
The provisioning process is divided into two phases:
- Bootstrap provisioning phase
- Cluster provisioning phase
Boostrap provisioning phase
In the bootstrap phase, furyctl automatically provisions:
- Virtual Private Cloud (VPC) in a specified CIDR range with public and private subnets.
- Cloud Nat: Enable instances in private subnets to connect to the internet or other GCP services, but prevent the internet from initiating a connection with those instances.
- GCP Instance bastion host with an OpenVPN Server.
- All the required networking gateways and routes.
Configure the bootstrap provisioner
The bootstrap provisioner takes a bootstrap.yml as input. This file, instructs the bootstrap provisioner with all the needed parameters to deploy the networking infrastructure.
For this tutorial, use the bootstrap.yml template located at /demo/infrastructure/bootstrap.yml:
kind: Bootstrap
metadata:
  name: fury-gcp-demo
spec:
  publicSubnetsCIDRs:
  - 10.0.1.0/24
  privateSubnetsCIDRs:
  - 10.0.101.0/24
  clusterNetwork:
    subnetworkCIDR: 10.1.0.0/16
    podSubnetworkCIDR: 10.2.0.0/16
    serviceSubnetworkCIDR: 10.3.0.0/16
  vpn:
    subnetCIDR: 172.16.0.0/16
    sshUsers:
    - <GITHUB_USER>
# executor:
#   state:
#     backend: gcs
#     config:
#       bucket: <GCS_BUCKET>
#       prefix: terraform/bootstrap
provisioner: gcp
Open the /demo/infrastructure/bootstrap.yml file with a text editor of your choice and:
- Replace the field
<GITHUB_USER>with your actual GitHub username. - Make sure that the VPC and subnets ranges are not already in use. If so, specify different values in the fields:
networkCIDRpublicSubnetsCIDRsprivateSubnetsCIDRsclusterNetwork
- (optional) Add the details of an existing GCS Bucket to hold the Terraform remote state.
(optional) Create a GCS Bucket to store the Terraform remote
Although this is a tutorial, it is always a good practice to use a remote Terraform state over a local one. In case you are not familiar with Terraform, you can skip this section.
The bootstrap provisioner does not create the GCS bucket for you.
- You can manually create it using the
gcloud cli:
gsutil mb gs://<GCS_BUCKET>

# Enable versioning (recommended for terraform state)
gsutil versioning set on gs://<GCS_BUCKET>
- Once created, uncomment the
spec.executor.stateblock in the/demo/infrastructure/bootstrap.ymlfile:
...
executor:
  state:
    backend: gcs
    config:
      bucket: <GCS_BUCKET>
      prefix: terraform/bootstrap
- Replace the
<GCS_BUCKET>with the correct values from the previous commands:
...
executor:
  state:
    backend: gcs
    config:
      bucket: fury-demo-gke # example value
      prefix: terraform/bootstrap
Provision networking infrastructure
- Initialize the bootstrap provisioner:
cd infrastructure
furyctl bootstrap init
In case you run into errors, you can re-initialize the bootstrap provisioner by adding the --reset flag:
furyctl bootstrap init --reset
- If the initialization succeeds, apply the bootstrap provisioner:
furyctl bootstrap apply
📝 This phase may take some minutes.
Logs are available at
/demo/infrastructure/bootstrap/logs/terraform.logs.
- When the
furyctl bootstrap applycompletes, inspect the output:
...
All the bootstrap components are up to date.

VPC and VPN ready:

VPC: fury-gcp-demo
Public Subnets  : [fury-gcp-demo-public-subnet-1]
Private Subnets : [fury-gcp-demo-private-subnet-1]
Cluster Subnet  : fury-gcp-demo-cluster-subnet
  Pod Subnet    : fury-gcp-demo-cluster-pod-subnet
  Service Subnet: fury-gcp-demo-cluster-service-subnet

Your VPN instance IPs are: [35.242.223.13]
...
In particular, have a look at VPC and subnets: these values are used in the cluster provisioning phase.
Cluster provisioning phase
In the cluster provisioning phase, furyctl automatically deploys a battle-tested private GKE Cluster. To interact with the private GKE cluster, you first need to connect to the private network - created in the previous phase - via the bastion host.
- Create the OpenVPN credentials with the
furyagent:
furyagent configure openvpn-client \
  --client-name fury \
  --config /demo/infrastructure/bootstrap/secrets/furyagent.yml \
  > fury.ovpn
🕵🏻♂️ Furyagent is a tool developed by SIGHUP to manage OpenVPN and SSH user access to the bastion host.
- Check that the
furyuser is now listed:
furyagent configure openvpn-client --list \
--config /demo/infrastructure/bootstrap/secrets/furyagent.yml
Output:
2021-06-07 14:37:52.169664 I | storage.go:146: Item pki/vpn-client/fury.crt found [size: 1094]
2021-06-07 14:37:52.169850 I | storage.go:147: Saving item pki/vpn-client/fury.crt ...
2021-06-07 14:37:52.265797 I | storage.go:146: Item pki/vpn/ca.crl found [size: 560]
2021-06-07 14:37:52.265879 I | storage.go:147: Saving item pki/vpn/ca.crl ...
+------+------------+------------+---------+--------------------------------+
| USER | VALID FROM |  VALID TO  | EXPIRED |            REVOKED             |
+------+------------+------------+---------+--------------------------------+
| fury | 2021-06-07 | 2022-06-07 | false   | false 0001-01-01 00:00:00      |
|      |            |            |         | +0000 UTC                      |
+------+------------+------------+---------+--------------------------------+
Open the
fury.ovpnfile with any OpenVPN Client.Connect to the OpenVPN Server via the OpenVPN Client.
Provision Cluster
The cluster provisioner takes a cluster.yml as input. This file instructs the provisioner with all the needed parameters to deploy the GKE cluster.
In the repository, you can find a template for this file at infrastructure/cluster.yml:
kind: Cluster
metadata:
  name: fury-gcp-demo
provisioner: gke
spec:
  version: 1.24
  network: fury-gcp-demo
  subnetworks:
  - 'fury-gcp-demo-cluster-subnet'
  - 'fury-gcp-demo-cluster-pod-subnet'
  - 'fury-gcp-demo-cluster-service-subnet'
  dmzCIDRRange: 10.0.0.0/16
  sshPublicKey: <public-ssh-key-content>
  tags: {}
  nodePools:
  - name: fury
    os: COS_CONTAINERD  # for Kubernetes +v1.24 we need to use a containerd-based node.
    version: null  # uses the same as the cluster
    minSize: 3
    maxSize: 3
    subnetworks:
    - "europe-west3-a"
    instanceType: "n1-standard-2"
    volumeSize: 50
executor:
  state:
    backend: gcs
    config:
      bucket: <GCS_BUCKET>
      prefix: terraform/cluster
provisioner: gke
Open the file with a text editor and replace:
<public-ssh-key-content>with the content of your public key (e.g.ssh-rsa YOUR_KEY)- Set the region for the subnet in the NodePools configuration.
- (optional) Add the details of an existing GCS Bucket to hold the Terraform remote state. If you are using the same bucket as before, please specify a different key.
Provision EKS Cluster
- Initialize the cluster provisioner:
furyctl cluster init
- Create GKE cluster:
furyctl cluster apply
📝 This phase may take some minutes.
Logs are available at
/demo/infrastructure/cluster/logs/terraform.logs.
- When the
furyctl cluster applycompletes, test the connection with the cluster:
export KUBECONFIG=/demo/infrastructure/cluster/secrets/kubeconfig
kubectl get nodes
ℹ️ KFD Ingress Module v1.13.0 includes a validating admission webhook that checks ingress definitions before accepting them. Validating webhooks are queried by the API server each time a request arrives. In GKE you need to create a firewall rule to enable the communication between the API server and the webhook. The installer already does this for the cert-manager and gatekeeper webhooks, but at the time of writing this guide, the rule creation for the ingress webhook has not been automated yet (see this GitHub issue). You will need to create the firewall rule manually in the mean time:
Make sure to replace
<YOUR_CLUSTER_NAME>with the name of your cluster before running the command:
gcloud compute firewall-rules create allow-nginx-ingress-admission-webhook \
  --description="Allow request from API server to worker nodes for NGINX Ingress Validating Admission Webhook" \
  --allow=tcp:9443 \
  --direction=INGRESS \
  --source-ranges="10.0.0.0/28" \
  --project="${GOOGLE_PROJECT}" \
  --network="<YOUR_CLUSTER_NAME>" \
  --target-tags="sighup-io-gke-cluster-<YOUR_CLUSTER_NAME>"
Step 2 - Download Fury modules
furyctl can do a lot more than deploy infrastructure. In this section, you will use furyctl to download the monitoring, logging, and ingress modules of the Fury distribution.
Inspect the Furyfile
furyctl needs a Furyfile.yml to know which modules to download.
For this tutorial, use the Furyfile.yml located at /demo/Furyfile.yaml:
versions:
  networking: v1.10.0
  monitoring: v2.0.1
  logging: v3.0.1
  ingress: v1.13.1
  dr: v1.10.1
  auth: v0.0.2
  opa: v1.7.3

bases:
  - name: networking
  - name: monitoring
  - name: logging
  - name: ingress
  # - name: dr
  # - name: opa

# modules:
#   - name: dr
Download Fury modules
- Download the Fury modules with
furyctl:
cd /demo/
furyctl vendor -H
- Inspect the downloaded modules in the
vendorfolder:
tree -d /demo/vendor -L 2
Output:
$ tree -d vendor -L 2

vendor
└── katalog
    ├── ingress
    ├── logging
    ├── monitoring
    ├── networking
    └── opa
Step 3 - Installation
Each module is a Kustomize project. Kustomize allows grouping together related Kubernetes resources and combining them to create more complex deployments. Moreover, it is flexible, and it enables a simple patching mechanism for additional customization.
To deploy the Fury distribution, use the main manifests/demo-fury/kustomization.yaml file:
---
apiVersion: kustomize.config.k8s.io/v1beta1
kind: Kustomization

resources:

# Ingress
- ../vendor/katalog/ingress/forecastle
- ../vendor/katalog/ingress/nginx
- ../vendor/katalog/ingress/cert-manager

# Logging
- ../vendor/katalog/logging/opensearch-single
- ../vendor/katalog/logging/opensearch-dashboards
- ../vendor/katalog/logging/logging-operator
- ../vendor/katalog/logging/logging-operated
- ../vendor/katalog/logging/configs
- ../vendor/katalog/logging/cerebro

# Monitoring
- ../vendor/katalog/monitoring/prometheus-operator
- ../vendor/katalog/monitoring/prometheus-operated
- ../vendor/katalog/monitoring/grafana
- ../vendor/katalog/monitoring/kube-state-metrics
- ../vendor/katalog/monitoring/node-exporter
- ../vendor/katalog/monitoring/alertmanager-operated
- ../vendor/katalog/monitoring/kube-proxy-metrics
- ../vendor/katalog/monitoring/gke-sm

# Custom resources
- resources/ingress.yml

# Disaster Recovery
# - ../vendor/katalog/dr/velero/velero-gcp
# - ../vendor/katalog/dr/velero/velero-schedules
# - resources/velero-backup-storage-location.yml
# - resources/velero-volume-snapshot-location.yml
# - resources/velero-cloud-credentials.yml

# Open Policy Agent Gatekeeper
# - ../vendor/katalog/opa/gatekeeper/

patchesStrategicMerge:
# Ingress
- patches/ingress-nginx-lb-annotation.yml
# Logging
- patches/logging-operated-resources.yml
# Monitoring
- patches/alertmanager-resources.yml
- patches/cerebro-resources.yml
- patches/opensearch-resources.yml
- patches/prometheus-resources.yml
This kustomization.yaml:
- references the modules downloaded in the previous sections
- patches the upstream modules (e.g.
patches/elasticsearch-resources.ymllimits the resources requested by elastic search) - deploys some additional custom resources (e.g.
resources/ingress.yml)
Install the modules:
cd /demo/manifests/

make apply
# Because we are creating some new CRDs, you need to wait a moment to give the API server time to process the new APIs and
# re-apply to create the custom resources.
make apply
# An error saying that calling webhook "validate.nginx.ingress.kubernetes.io" is normal. Just wait for the NGINX Ingress Controller to be ready and re-apply.
Step 4 - Explore the distribution
🚀 The distribution is finally deployed! In this section, you explore some of its features.
Setup local DNS
- Get the address of the internal load balancer:
kubectl get svc ingress-nginx -n ingress-nginx --no-headers | awk '{print $4}'
Output:
10.1.0.5
- Add the following line to your local
/etc/hosts:
10.1.0.5 directory.fury.info prometheus.fury.info alertmanager.fury.info logs.fury.info grafana.fury.info
Now, you can reach the ingresses directly from your browser.
Forecastle
Forecastle is an open-source control panel where you can access all exposed applications running on Kubernetes.
Navigate to http://directory.fury.info to see all the other ingresses deployed, grouped by namespace.
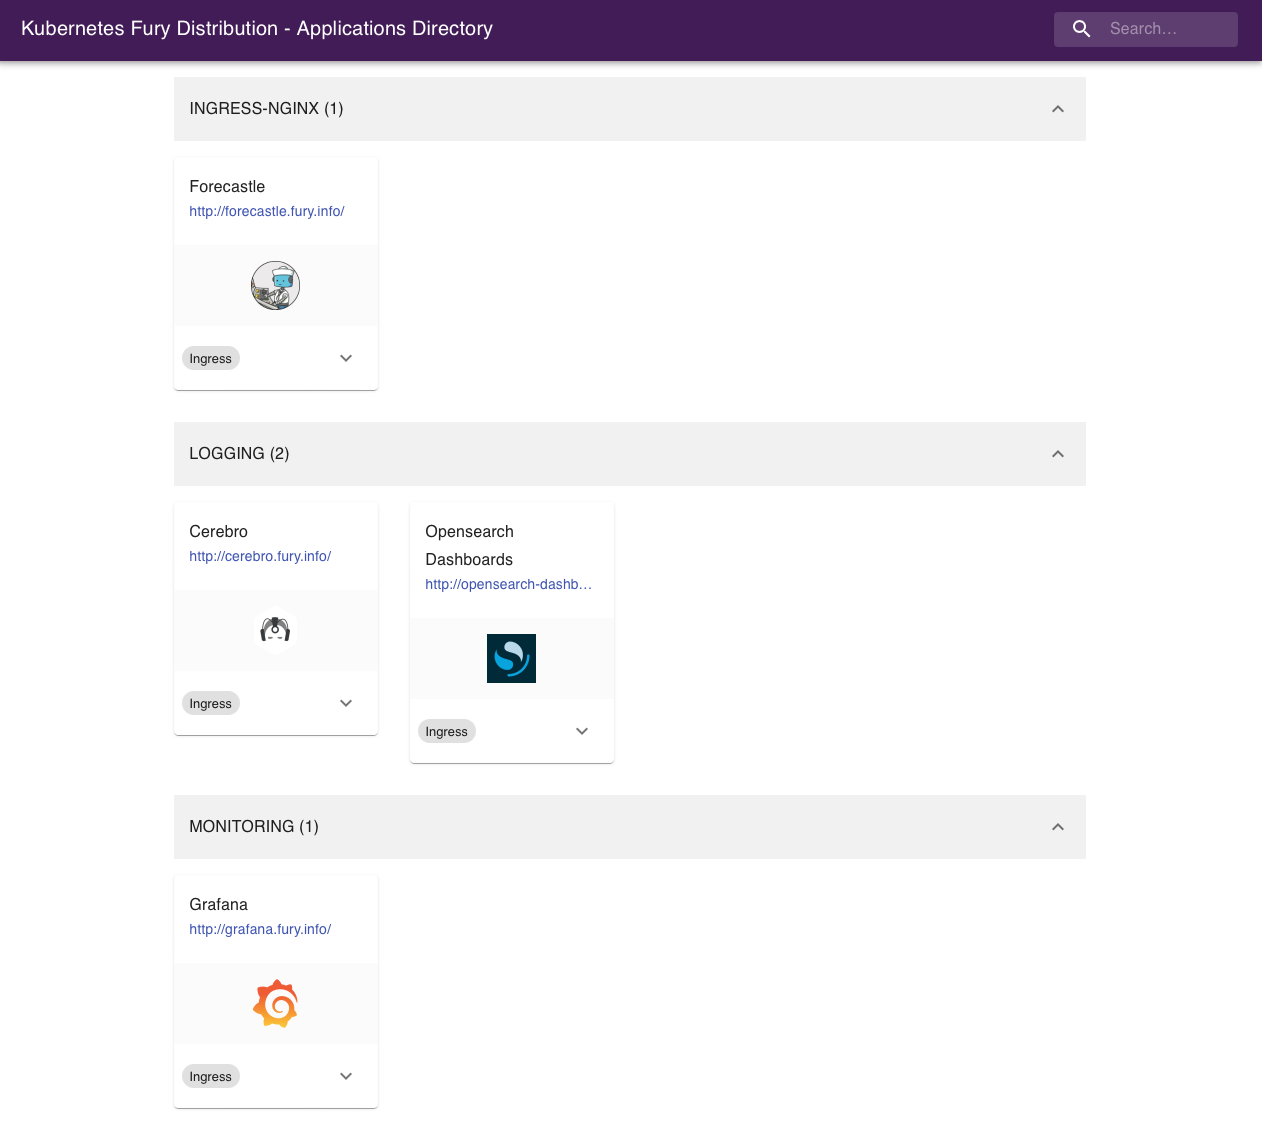
OpenSearch Dashboards
OpenSearch Dashboards is an open-source analytics and visualization platform for OpenSearch. OpenSearch Dashboards lets you perform advanced data analysis and visualize data in various charts, tables, and maps. You can use it to search, view, and interact with data stored in OpenSearch indices.
Navigate to http://logs.fury.info or click the OpenSearch Dashboards icon from Forecastle.
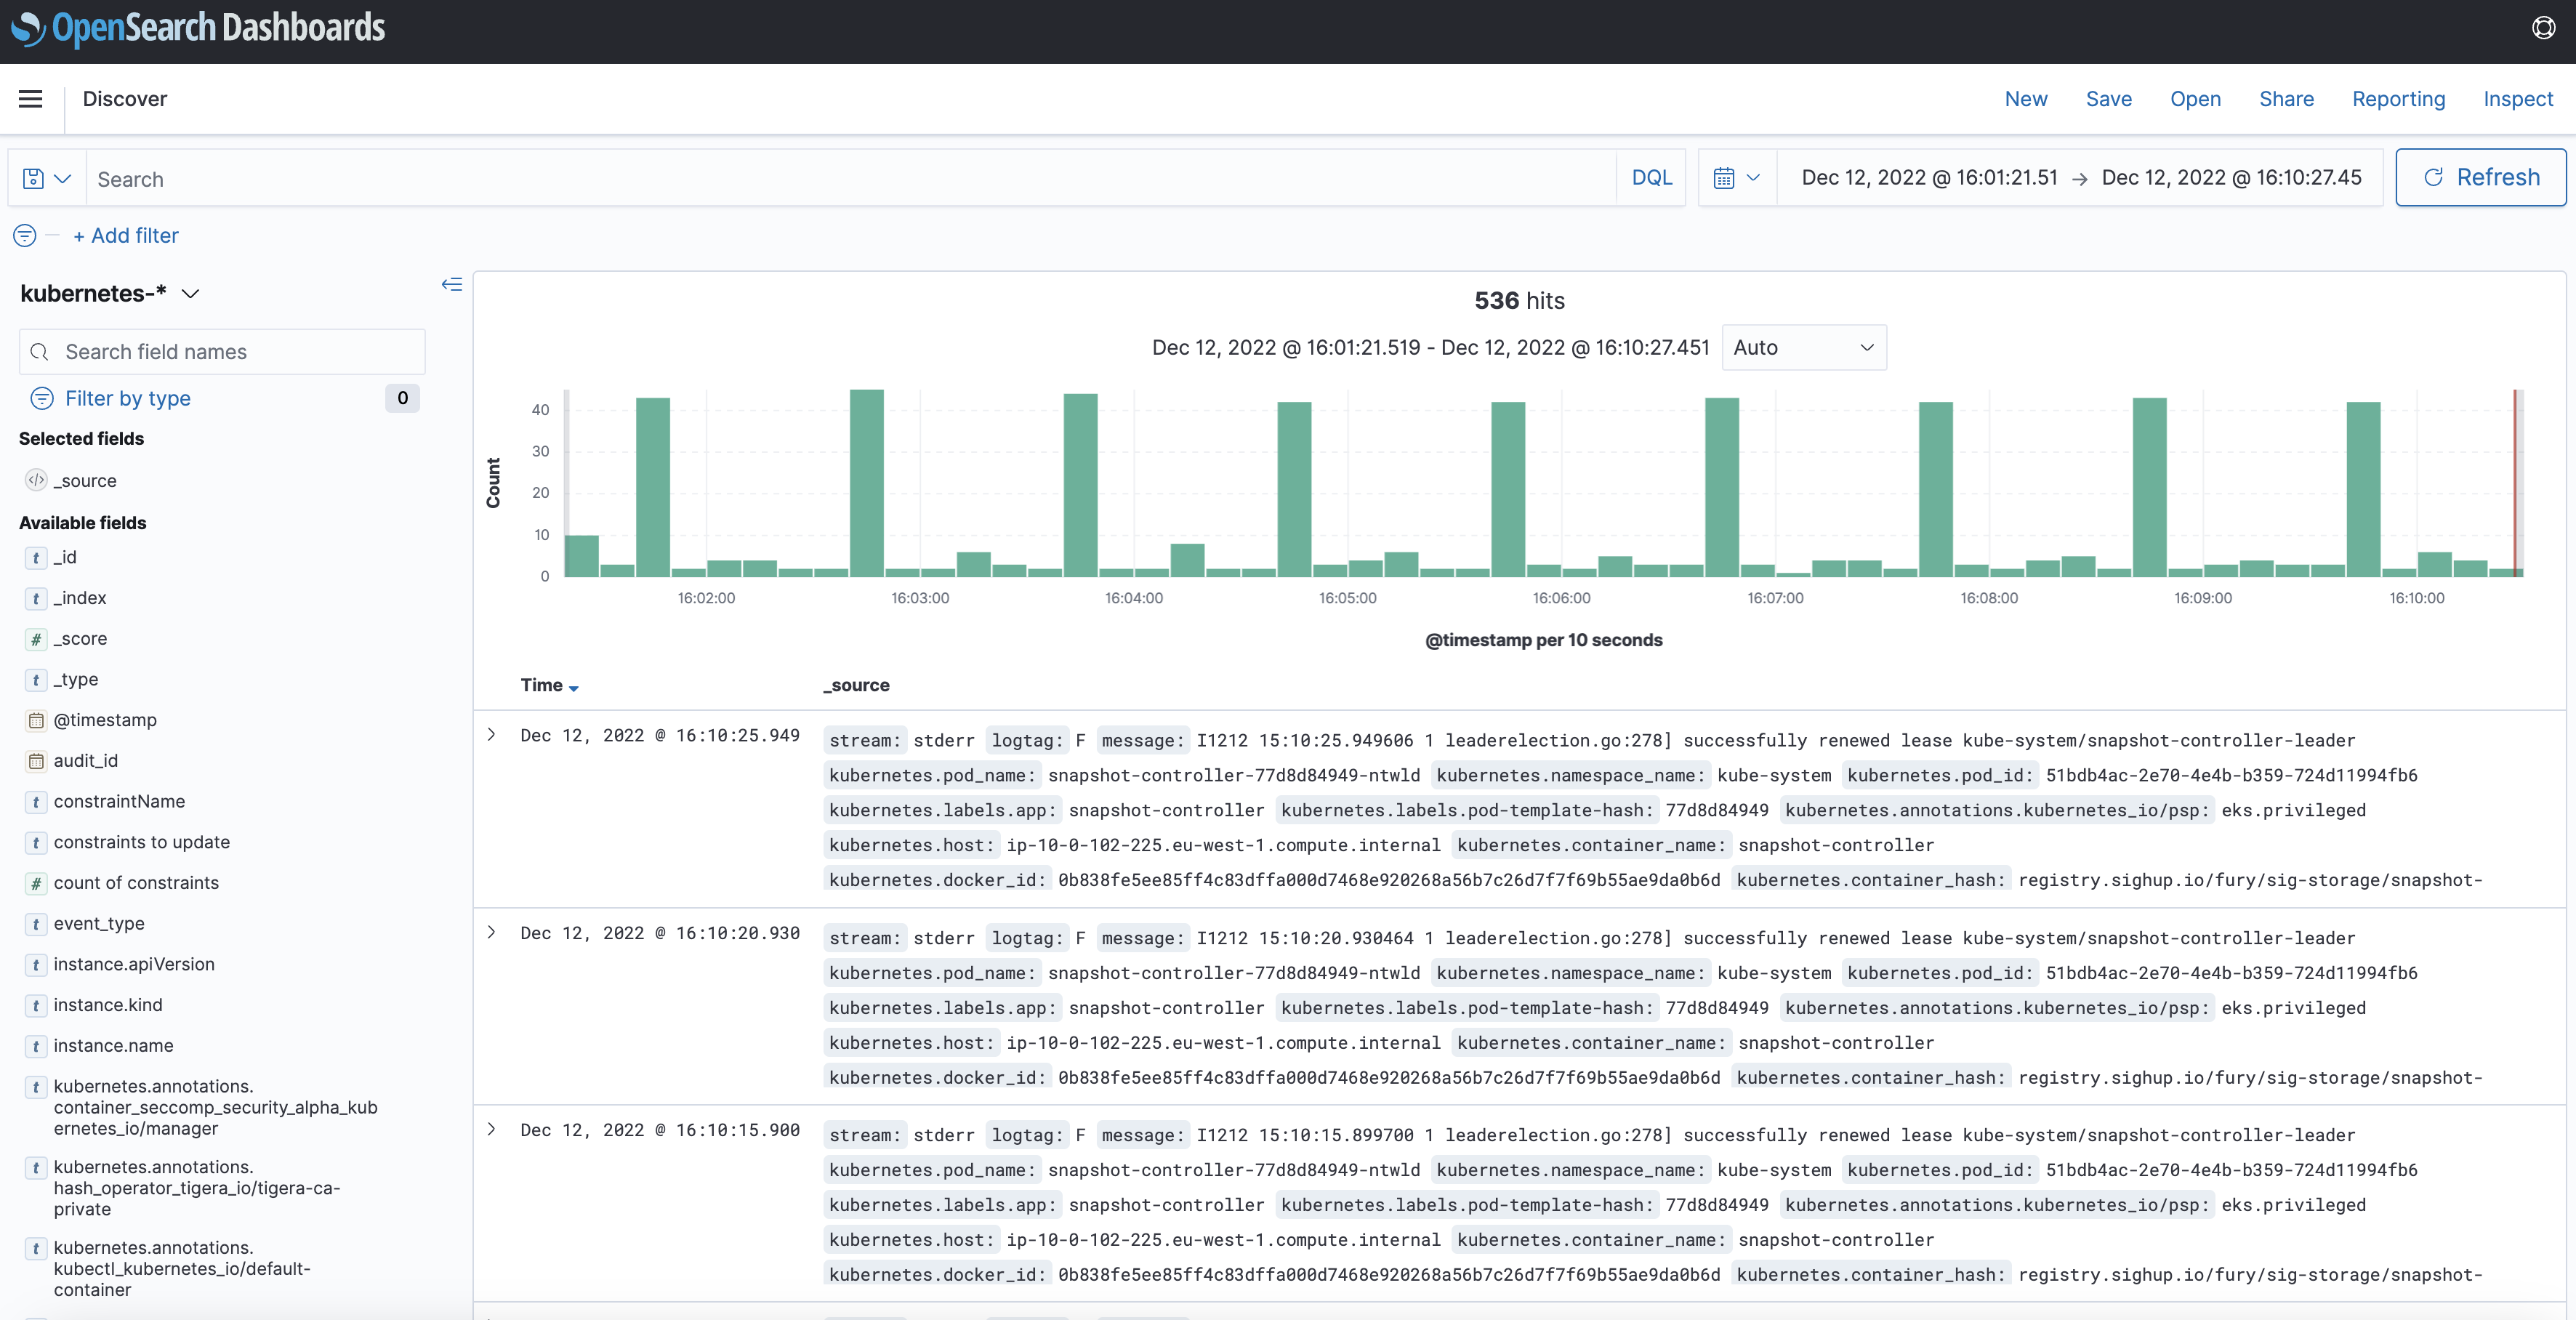
Read the logs
The Fury Logging module already collects data from the following indices:
kubernetes-*systemd-*ingress-controller-*events-*
Click on Discover to see the main dashboard. On the top left corner select one of the indices to explore the logs.
Grafana
Grafana is an open-source platform for monitoring and observability. Grafana allows you to query, visualize, alert on and understand your metrics.
Navigate to http://grafana.fury.info or click the Grafana icon from Forecastle.
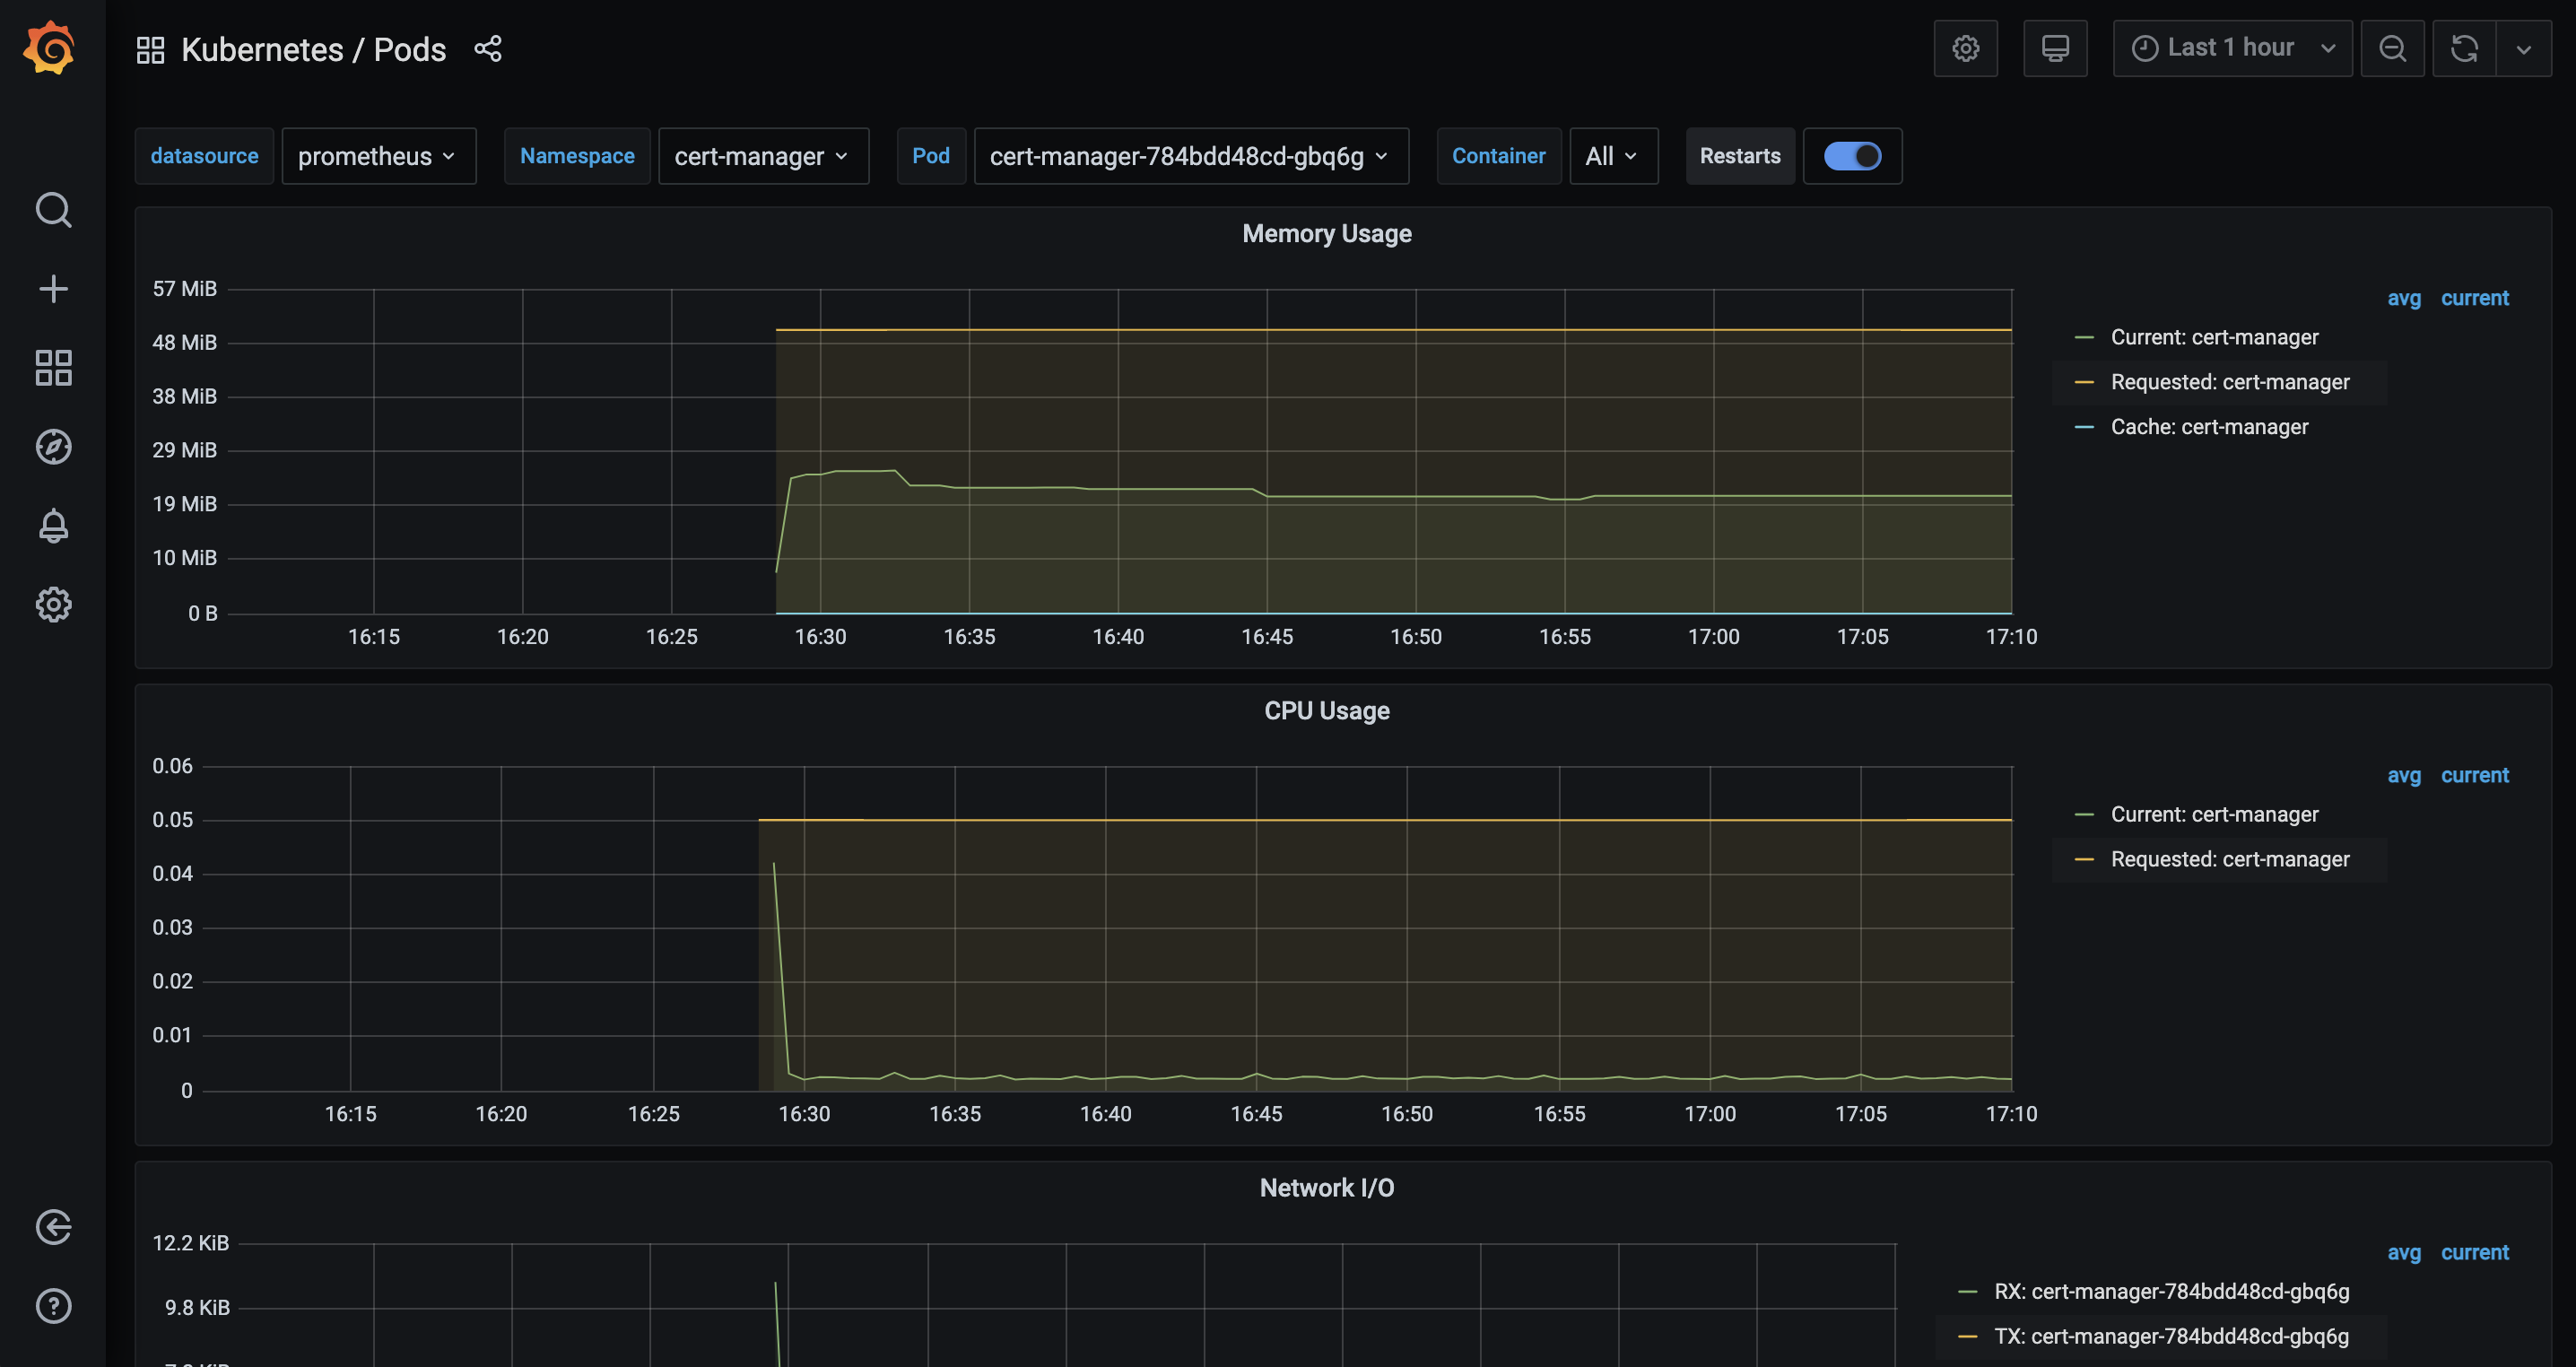
Fury provides pre-configured dashboards to visualize the state of the cluster. Examine an example dashboard:
Click on the search icon on the left sidebar.
Write
podsand click enter.Select the
Kubernetes/Podsdashboard.
This is what you should see:
Step 5 (optional) - Deploy additional modules
We now install other modules:
- dr
- opa
To deploy Velero as a Disaster Recovery solution, we need to have credentials to interact with GKE volumes.
- Let's add a module at the bottom of
Furyfile.yml:
versions:
  ...
  dr: v1.10.0
  opa: v1.7.3

bases:
  ...
  - name: dr
  - name: opa

modules:
- name: dr
- And download the new vendor folders:
furyctl vendor -H
- Create the resources using Terraform:
cd /demo/terraform/demo-fury
# Update the provided `main.tf` file with your configuration.
terraform init
terraform plan -out terraform.plan
terraform apply terraform.plan

# Output the resources to yaml files, so we can use them in kustomize
terraform output -raw velero_backup_storage_location > ../../manifests/resources/velero-backup-storage-location.yml
terraform output -raw velero_volume_snapshot_location > ../../manifests/resources/velero-volume-snapshot-location.yml
terraform output -raw velero_cloud_credentials > ../../manifests/resources/velero-cloud-credentials.yml
- Add the following lines to
kustomization.yaml:
resources:

...

# Disaster Recovery
- ../../vendor/katalog/dr/velero/velero-gcp
- ../../vendor/katalog/dr/velero/velero-schedules
- resources/velero-backup-storage-location.yml
- resources/velero-volume-snapshot-location.yml
- resources/velero-cloud-credentials.yml

# Open Policy Agent
- ../../vendor/katalog/opa/gatekeeper/core
- ../../vendor/katalog/opa/gatekeeper/monitoring
- ../../vendor/katalog/opa/gatekeeper/rules
- Install the modules with:
cd /demo/manifest/

make apply
# wait for a moment for the new CRDs to be processed and re apply the manifests
make apply
- Create a backup with the
velerocommand-line utility:
velero backup create --from-schedule manifests test -n kube-system
- Check the backup status:
velero backup get -n kube-system
The output should be something like the following:
$ velero backup get -n kube-system
NAME   STATUS      ERRORS   WARNINGS   CREATED                         EXPIRES   STORAGE LOCATION   SELECTOR
test   Completed   0        0          2023-01-02 15:50:16 +0000 UTC   29d       default            <none>
- Try to create a pod that is not compliant with the default OPA rules
kubectl run --image curlimages/curl curlero -- sleep 500
The creation should fail with the following error:
$ kubectl run --image curlimages/curl curlero -n kube-system -- sleep 500
Error from server (Forbidden): admission webhook "validation.gatekeeper.sh" denied the request: [liveness-probe] Rejecting "Pod/curler" for not specifying a livenessProbe
[readiness-probe] Rejecting "Pod/curler" for not specifying a readinessProbe
[enforce-deployment-and-pod-security-controls] container 'curler' in the 'curler' Pod allows priviledge escalation
[enforce-deployment-and-pod-security-controls] container 'curler' in the 'curler' Pod does not have a CPU limit set
[enforce-deployment-and-pod-security-controls] container 'curler' in the 'curler' Pod does not have a memory limit set
[enforce-deployment-and-pod-security-controls] container 'curler' in the 'curler' Pod is running as root
[enforce-deployment-and-pod-security-controls] container 'curler' in the Pod 'curler' has an image 'curlimages/curl' using the latest tag
💡 the kube-system namespace is exempted from the OPA rules by default. If you try to create the same Pod in this namespace it should succeed:
$ kubectl run --image curlimages/curl curler -n kube-system -- sleep 500
pod/curler created
Step 6 - Teardown
To clean up the environment:
# (Required if you performed Disaster Recovery step)
cd /demo/terraform/demo-fury
terraform destroy

# Destroy cluster
cd /demo/infrastructure
furyctl cluster destroy

# Destroy network components
# we need to delete the Firewall that we created manually first
gcloud compute firewall-rules delete allow-nginx-ingress-admission-webhook
# now we can delete the rest of the resources
cd /demo/infrastructure
furyctl bootstrap destroy

#(Optional) Destroy bucket
# ⚠️ replace <GCS_BUCKET> with your bucket name
gsutil -m rm -r gs://<GCS_BUCKET>/terraform
gsutil rb gs://<GCS_BUCKET>
Conclusions
Congratulations, you made it! 🥳🥳
We hope you enjoyed this tour of Fury!